Virtual Reality R/C Car Part 2
Virtual Reality R/C Car Part 2
Apr 25, 2018
Luke Ridley
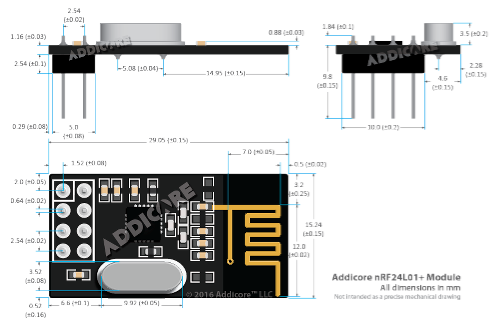
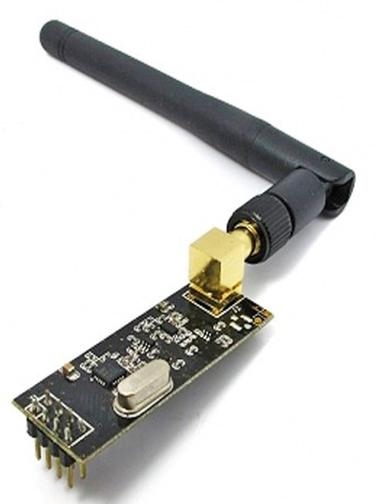
Now that I know the values that each of the potentiometers on the bike output, the next step is to transmit the values over a radio. The Arduino compatible Radio Frequency chips that I chose to use were the nRF24L01+ 2.4GHz wireless transceivers. I chose these transceivers for a couple reasons. One is that these chips is that they come in two different models that communicate with the the Arduino the same way. The low power version comes with a built in antenna and has a range of about 100 feet. I have seen this model vary in price from $0.89 to around $4. The high power version has an external antenna and has a range of around 1000 feet. I have seen this model vary in price from about $4 to $15 online.
Low Power Module

High Power Module

Another reason I chose to use these modules was because they are well documented and widely used. I suppose they are so widely used because of how inexpensive they are. But all the documentation I used to learn how to set them up can be found here:
https://arduino-info.wikispaces.com/Nrf24L01-2.4GHz-HowTo
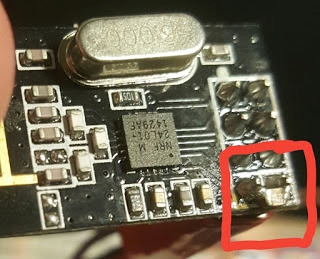
This website gives some great examples and background knowledge of how the chips work so that anyone can begin transmitting radio signals in no time. One thing that needs to be added to the chip though is a capacitor across power and ground. Without this capacitor the chip will not function properly. The capacitor should be between 3.3 and 10 micro Farads. An example shown below.

So the next step to getting this bike working as a R/C car controller was to make sure that the Arduino connected to the bike potentiometers would use the nRF24L01+ to transmit the values and another Arduino which would use it's own nRF24L01+ to read these values and print them to the serial monitor on the computer screen to check that they are in fact the same ranges of values that were read before.
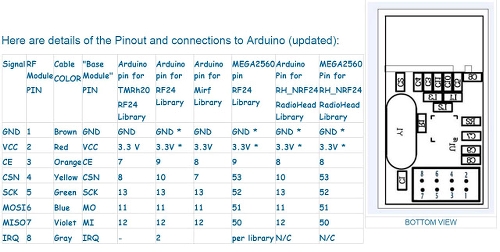
Connecting the nRFL01+

The library that I used to interface the Arduino with the chip was the TMRh20 RF24 library so I used the fifth column to determine where to hook up each pin. This makes it really easy to connect and use the chips because once the TMRh20 RF24 library is downloaded and included, the functions created in this library can be used to interface with the chip. Below is the Code I used to test the chips and make sure that the data made it from one chip to the next.
Transmit Code
#include <SPI.h>   //SPI library to communicate with the nRF24+

#include "RF24.h"  //

#include "printf.h" // Needed for "printDetails" which is a debugging tool


#define  CE_PIN  9   // The pins to be used for CE and CSN

#define  CSN_PIN 10


RF24 radio(CE_PIN, CSN_PIN);


byte addresses[][6] = {"1Node", "2Node"}; // These will be the names of the "Pipes"


unsigned long timeNow;  // Used to grab the current time, calculate delays

unsigned long started_waiting_at;

boolean timeout;       // Timeout? True or False


struct dataStruct {

  unsigned long _micros;  // to save response times

  int throttle;          // The Joystick position values

  int handBreak;

  int bikeTilt;

} myData;                 // This can be accessed in the form:  myData.throttle


void setup()

{

  Serial.begin(115200);   //Baud Rate

  /*printf_begin();  //uncomment for debug info*/


  radio.begin();          // Initialize the nRF24L01 Radio

  radio.setChannel(108);  // Above most WiFi frequencies corresponds to 2.400 GHz + 0.108 GHz meaning radio is set to 2.508 GHz

  radio.setDataRate(RF24_250KBPS);


  //radio.setPALevel(RF24_PA_LOW);

  radio.setPALevel(RF24_PA_HIGH);

  //  radio.setPALevel(RF24_PA_MAX);


  // Open a writing and reading pipe on each radio, with opposite addresses

  radio.openWritingPipe(addresses[0]);

  radio.openReadingPipe(1, addresses[1]);


  // Start the radio listening for data

  radio.startListening();


//  radio.printDetails(); //Uncomment to show a ton of debugging information

}


void loop()   /****** LOOP: RUNS CONSTANTLY ******/

{

  radio.stopListening();                                    // First, stop listening so we can talk.


    myData.throttle = analogRead(A0);

    myData.handBreak = analogRead(A2);

    myData.bikeTilt = analogRead(A4);

    myData.pushButton  = digitalRead(7);  // Invert the pulldown switch


  myData._micros = micros();  // Send back for timing


    Serial.print("Throttle = ");

    Serial.print(myData.throttle);

    Serial.print("\t");

    Serial.print("Hand Break = ");

    Serial.print(myData.handBreak);

    Serial.print("\t");

    Serial.print("Bike Tilt = ");

    Serial.println(myData.bikeTilt);


  // Serial.print(F("Now sending  -  "));


  if (!radio.write( &myData, sizeof(myData) )) {

    Serial.println(F("Transmit failed "));

  }


  radio.startListening();


  started_waiting_at = micros();               // timeout period, get the current microseconds

  timeout = false;                            //  variable to indicate if a response was received or not


  while ( ! radio.available() ) {

    if (micros() - started_waiting_at > 200000 ) {           // If waited longer than 200ms, indicate timeout and exit while loop

      timeout = true;

      break;

    }

  }


  if ( timeout )

  { // Describe the results

    Serial.println(F("Response timed out -  no Acknowledge."));

  }

  else

  {

    // Grab the response, compare, and send to Serial Monitor

    radio.read( &myData, sizeof(myData) );

    timeNow = micros();


    // Show it

    /*

    Serial.print(F("Sent "));

    Serial.print(timeNow);

    Serial.print(F(", Got response "));

    Serial.print(myData._micros);

    Serial.print(F(", Round-trip delay "));

    Serial.print(timeNow - myData._micros);

    Serial.println(F(" microseconds "));

    */


  }


  // Send again after delay. When working OK, change to something like 100

  delay(100);


}
Recieve Code
#include <SPI.h>

#include "RF24.h"


RF24 radio(9, 10);


byte addresses[][6] = {"1Node", "2Node"}; // These will be the names of the "Pipes"


struct dataStruct {

  unsigned long _micros;  // to save response times

  int throttle;          // The Joystick position values

  int handBreak;

  int bikeTilt;

} myData;                 // This can be accessed in the form:  myData.throttle


void setup()

{

  Serial.begin(115200);


  radio.begin();          // Initialize the nRF24L01 Radio

  radio.setChannel(108);  //make sure it is the same channel as the tranmitter

  radio.setDataRate(RF24_250KBPS);


  radio.setPALevel(RF24_PA_HIGH);


  // Open a writing and reading pipe on each radio, with opposite addresses

  radio.openWritingPipe(addresses[1]);

  radio.openReadingPipe(1, addresses[0]);


  // Start the radio listening for data

  radio.startListening();

}


void loop()

{

  if ( radio.available())

  {

    while (radio.available())   // While there is data ready to be retrieved from the receive pipe

    {

      radio.read( &myData, sizeof(myData) ); // Get the data

    }


    radio.stopListening();                     // First stop listening so we can transmit

    radio.write( &myData, sizeof(myData) );    // Send the received data back.

    radio.startListening();                    // Now resume listening so we catch the next packet


    Serial.print("Throttle = ");

    Serial.print(myData.throttle);

    Serial.print("\t");

    Serial.print("Hand Break = ");

    Serial.print(myData.handBreak);

    Serial.print("\t");

    Serial.print("Bike Tilt = ");

    Serial.println(myData.bikeTilt);


  }


}
Now that we know the radio chips are communicating properly the next step is to make sure that the receiving Arduino can use the data it receives to control both the ESC and the Servo on the R/C car. To do this I have updated the code on the receiving Arduino a little bit.
The ESC can be controlled the same as a servo but because the regular <Servo.h> has a timer conflict with the RF24 library the <SoftwareServo.h> library was implemented. This library works very similar to the regular servo library. The main difference is that the SoftwareServo::refresh(); function must be called each loop in order to update the value being written to the servo. Another intricacy of using the Arduino to power the ESC is that it must be "primed." This means that it needs an initial value to be written to it before it is actually responsive.
Code
#include <SoftwareServo.h>

#include <SPI.h>

#include "RF24.h"


RF24 radio(9, 10);

SoftwareServo steering;

SoftwareServo ESC;


byte addresses[][6] = {"1Node", "2Node"}; // These will be the names of the "Pipes"


struct dataStruct {

  unsigned long _micros;  // to save response times

  int throttle;          // The Joystick position values

  int handBreak;

  int bikeTilt;

} myData;                 // This can be accessed in the form:  myData.Xposition  etc.


void setup()

{

  Serial.begin(115200);


  pinMode(3, OUTPUT);

  pinMode(5, OUTPUT);


  radio.begin();          // Initialize the nRF24L01 Radio

  radio.setChannel(108);

  radio.setDataRate(RF24_250KBPS);


  radio.setPALevel(RF24_PA_HIGH);


  // Open a writing and reading pipe on each radio, with opposite addresses

  radio.openWritingPipe(addresses[1]);

  radio.openReadingPipe(1, addresses[0]);


  // Start the radio listening for data

  radio.startListening();

  steering.attach(3);

  ESC.attach(5);

  ESC.write(40); //to prime the ESC

}


void loop()

{

  if ( radio.available())

  {

    while (radio.available())   // While there is data ready to be retrieved from the receive pipe

    {

      radio.read( &myData, sizeof(myData) ); // Get the data

    }


    radio.stopListening();                     // First stop listening so we can transmit

    radio.write( &myData, sizeof(myData) );    // Send the received data back.

    radio.startListening();                    // Now resume listening so we catch the next packet

  }

    SoftwareServo::refresh();

    int drive;

    int bikeTiltRecieved = myData.bikeTilt;

    int handBreakRecieved = myData.handBreak;

    int throttleRecieved = myData.throttle;

    int tilt = map(bikeTiltRecieved, 0, 1023, 0, 180);

    if (throttleRecieved > 100 && handBreakRecieved < 100)

    {

      drive = 96;

    }

    if (throttleRecieved < 100 && handBreakRecieved > 100)

    {

      drive = 85;

    }

    if (throttleRecieved > 100 && handBreakRecieved > 100)

    {

      drive = 90;

    }

    if (throttleRecieved < 100 && handBreakRecieved < 100)

    {

      drive = 90;

    }

    steering.write(tilt);

    ESC.write(drive);

    Serial.println(drive);

}
