RC Boat Project: Update 3
RC Boat Project: Update 3
Jul 31, 2018
Ryan Kwaterski
This week was a busy week of resurfacing the vessel. Using XTC-3D as seen in figure 1 the bottom of the hull was resurfaced. This product is specifically designed to fill in small holes and imperfections from the 3D printing process.
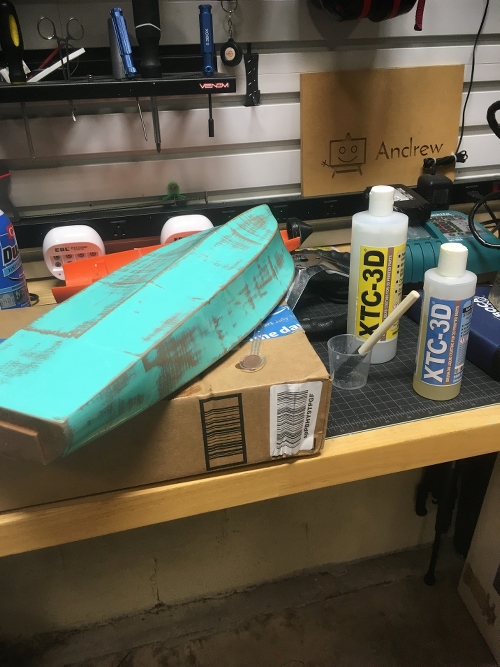
Figure 1: XTC-3D applied to bottom of the hull.
You simply use a small dish or cup and thoroughly mix in 2 parts XTC-3D yellow with 1 part XTC-3D blue (latex gloves should be worn during the mixing and application process). A little goes a long way with this product and should be applied in a very thin layer. The “self-leveling” characteristics make applying it very easy and effective. After the bottom of the hull was dry, the boat was flipped right-side up and the top was then coated in the same product as seen in figure 2. The drying time is about 2 hours and dries glossy, which is the perfect look I was going for. Once it was dry it was time to give it a light sanding with P220. The XTC-3D was applied, let stand to dry, then sanded a total of 3 times in order to get the boat to a smooth mirror like finish.
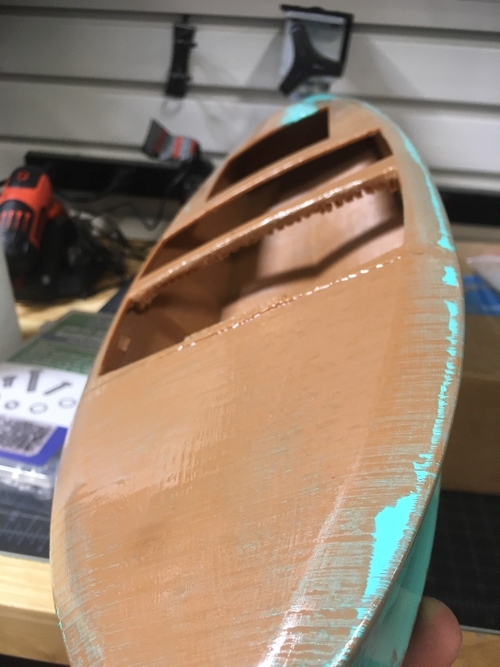
Figure 2: Top of boat after XTC-3D was dry.
Tags
Archives
-
2021
-
2021
- 2020
-
2019
- ASV Part 7
- Pin Ball Machine Part 5
- Football Thrower Part 8
- Pinball Machine Part 4
- Pinball Machine Part 3
- Bottle Car Part 3
- Toy Car Power Wheels Part 4
- ASV Part 6
- Pinball Machine Part 2
- Football Thrower Part 7
- Pinball Machine
- Football Thrower Part 6
- Toy Car Power Wheels Part 3
- Football Thrower Part 5
- ASV Part 4
- Football Thrower Part 4
- Football Thrower Part 3
- ASV Part 3
- ASV Part 2
- Wire Bender Project
- Football Thrower Part 2
- ASV (Automated Surface Vehicle)
- Toy Car Power Wheels Vid
- Football Thrower
- Toy Car Power Wheels Part 2
- Toy Car Power Wheels
- Bottle Car Part 2
- Time Lapse
- Bottle Racer Launcher
- Shirogorov Multi Row Bearing System Disassembly
- Candy Sorter - Project Update 4
- Candy Sorter Project - Update 3
- Candy Sorter Project - Update 2
- Wire Bender Project - Part 1
- Solar Panel Light Tracking Project: Update 3
- Candy Sorter Project - Update 1
-
2018
- Solar Panel Light Tracking Project: Update 2
- Solar Panel Light Tracking Project: Update 1
- Workshop Weekly Update 19: Maker Faire Preparation
- Lew's Speed Spool Upgraded with Boca Bearings
- Project Rocket League - Part 1
- RC Boat Project: Update 9
- RC Boat Project: Update 8
- Power Wheels Racer 2.0: Update 4
- Autonomous Submarine Project: Part 5
- RC Boat Project: Update 7
- Autonomous Submarine Project: Part 4
- How to prepare for an F1 in Schools Competition with Team Divignite
- Autonomous Submarine Project: Part 3
- 3D Printed Ford Flathead V8 Engine Working Model
- Autonomous Submarine Project: Part 2
- RC Boat Project: Update 6
- Autonomous Submarine Project: Part 1
- Power Wheels Racer 2.0: Update 3
- RC Boat Project: Update 5
- Workshop Weekly Update 18: Submarine Hull
- RC Boat Project: Update 4
- Workshop Weekly Update 17: Power Wheels Racer Steering
- RC Boat Project: Update 3
- Boca Bearings Workshop Weekly Update 16
- RC Boat Project: Update 2
- Pi Zero Drone Part 9: Calibrating ESC Manually
- Boca Bearings Workshop Weekly Update 15
- Pi Zero Drone Part 8: On board Instrument Calibration
- Power Wheels Racer 2.0: Update 2
- Boca Bearings Workshop Weekly Update 14
- RC Boat Project: Update 1
- Power Wheels Racer 2.0: Update 1
- Electric Skateboard Project Update 2
- Boca Bearings Workshop Weekly Update 13
- RC Boat Introduction
- Autonomous Submarine Introduction
- Power Wheels Racer Part 15: Post-Race Update
- Power Wheels Racer Part 14: Updates Before Maker Faire
- Penn US 113W Fishing Reel Upgraded with Boca Bearings
- Power Wheels Racer: Part 13
- Pi Zero Drone Post 7: Modular Body
- Nano Blade QX2 Repairs
- Pi Zero Drone 6: After First Flight and Mods
- Pi Zero Drone Part 5: Testing...
- Fitbit Cheat-O-Matic 2: 3D Printed Mechanical Simplicity (Intro)
- Power Wheels Racer Part 12: Updates and fixes
- Pi Zero Drone Part 4: Calibrations
- SECME Mouse Trap Car Racing
- Virtual Reality R/C Car: Part 5
- The Pi Zero Drone Part 3: Connecting the PXFmini
- Virtual Reality R/C Car: Part 4 Adding The Head Tracker
- Racing Power Wheels Part 11: Fixing the Caster for Stable Steering
- The Pi Zero Drone Part 2: Construction of the Frame
- Virtual Reality R/C Car Part 3
- 3D Printed Camaro LS3 V8 Engine
- Iron Man Helmet Project - Part 1
- F1 in Schools - Bearing and Wheel Design
- Virtual Reality R/C Car Part 2
- Virtual Reality R/C Car Part 1
- Racing Power Wheels Part 10: New Hydraulic Brake System
- The Pi Zero Drone Part 1: Introduction
- Racing Power Wheels Part 9: Demonstration, Test Run, and Steering Problems
- Racing Power Wheels Part 8: The Brakes, Problems Encountered, and Sparks Resolved
- Racing Power Wheels Part 7: Setting up the Steering
- Boca Bearings Workshop Weekly Update 12
- Racing Power Wheels Part 6: Motor Testing, Controller, and Sparks
- Racing Power Wheels Part 5: The Rear Axle and Parts
- Racing Power Wheels Part 4: Project Update on the Motor Kit and Batteries
- Flytanium Butterfly Knife Bearing Tolerance Comparison
- Racing Power Wheels Part 3: Selecting Sprocket Size and Calculating Speed
- Functional Jet Turbine Project Part 1
- Racing Power Wheels Part 2: Axle, Rear Wheels, Brakes, and Sprockets
- Boca Bearings Workshop Weekly Update 11
- Zero Tolerance 0808 Folding Knife Bearing Upgrade
- Boca Bearings on a HOPE EVO 2 Hub Set
- Wave Energy Senior Design Project
- Boca Bearings Workshop Weekly Update 10
- 3D Printed Robotic Hand: Part 8 - The Wiring Diagram of the Hand and Codes for Adafruit Servo Shield
- Racing Power Wheels Part 1: The Dune Racer and Motor Kit Selection
- Game of Drones Hiro Airframe Quadcopter Part 1: Building the Quadcopter
- Boca Build 2.0 Geared Sliding Puzzle: Final Fabrication
- Boca Build 2.0 Geared Sliding Puzzle: Control Box
- Boca Bearings Workshop Weekly Update 9
- Traxxas XO-1: Boca Bearings Install
- SeaTech and Boca Bearings
- Ryworx Omeme Butterfly Knife Bearing Walkthrough
- 3D Printed Robotic Hand: Part 7 - The Last Codes Used (No Servo Shield Required)
- Simple Robotic Arm Made Out of Cardboard Pieces - Part 2: How to make it
- Boca Bearings Innovation Series: Acavallo Carousel
- Autonomous Rover Part 6: Troubleshooting
- Boca Bearings Innovation Series: Primal 2 Speedbike
- Boca Bearings Innovation Series: Human Powered Helicopter - Gamera
- Boca Build 2.0 Geared Sliding Puzzle Part 4: Clutch
- Boca Bearings Workshop Weekly Update 8
- Boca Bearings Workshop Weekly Update 7
- Autonomous Rover Part 5: Using the ArduPilot Mega(APM) and GPS
- Boca Bearings Workshop Weekly Update 6
- Boca Build 2.0 Geared Sliding Puzzle Part 3: Fabrication Details
- DIY Stunt Wire System - Part 2
- DIY Stunt Wire System - Part 1
-
2017
- Boca Build 2.0 Geared Sliding Puzzle Part 2: Fabrication
- Maker Faire Orlando 2017 - Part 2
- Maker Faire Orlando 2017 - Part 1
- The Drone Scene in South Florida
- Boca Build 2.0 Geared Sliding Puzzle Part 1: Design
- Traxxas TQi Telemetry Radio and App: Part 4 - Car Run and Performance
- Hybridized Garrett Boca Bearings Turbine - Part 3
- Amundson TCP450 Fishing Reel Bearing Installation
- Simple Robotic Arm Made Out of Cardboard Pieces
- Autonomous Rover Part 4: Finishing Up the Build and Some Demonstration
- 1/10th Scale Replica 1984 CJ7 Jeep
- Vintage Tool Box 3D Printed: Part 4 - Final Details
- Autonomous Rover Part 3: Building the Frame
- Hybridized Garrett Boca Bearings Turbine - Part 2
- Vintage Tool Box 3D Printed: Part 3 - Testing and Refining
- Vintage Toolbox 3D Printed: Part 2 - Construction and Fabrication
- Hybridized Garrett Boca Bearings Turbine - Part 1
- Boca Bearings Workshop Weekly Update 5
- Traxxas TQi Telemetry Radio and App: Part 3 - Telemetry Setup and Testing
- Autonomous Rover Part 2: The MINDS-i 4X4 3-in-1 Robot and the FlySky FS-T6 Transmitter
- Vintage Toolbox 3D Printed: Part 1 - Design and Research
- Autonomous Rover Part 1: Project Proposal
- Para-Athlete Alfonso Garibay Jr.
- Traxxas TQi Telemetry Radio and App: Part 2 - Bearings Replacements
- 3D Printed Robotic Hand: Part 6 - More Programming and Debugging
- 3D Printed Robotic Hand: Part 5 - Programming and Debugging
- Aermacchi Crank Alignment and Balancing Tool
- Boca Bearings Workshop Weekly Update 4
- 3D Scanner Project Update 1
- Boca Bearings Workshop Weekly Update 3
- RC Car Project - Update 3
- Boca Bearings Workshop Weekly Update 2
- Modified Bike Project: Part 4 - The Bike
- Boca Bearings Workshop Weekly Update 1
- Upgrading Jigging Master Ocean Devil PE5 with Boca Bearings
- 3D Printed Robotic Hand: Part 4 - The 3D Printed Hand Build
- Arduino Robot Project: Part 5 - Video Demonstration
- 3D Printed Robotic Hand: Part 3 - The Glove Build
- New and Expanded Inventory of Mounted Unit Bearings
- 3D Printed Robotic Hand: Part 2 - Pre-build
- Boca Bearings on Shimano XTR Wheels
- Quantum Vapor Bearing Upgrade
- RC Car Project - Update 2
- Boca Bearings Fidget Spinner Collection Competition
- Zerobot Project - Update 3
- Zerobot Project - Update 2
- Introducing Miami artist maker and robot sculptor Jorge Roldan
- 3D Printed Robotic Hand: Part 1 - Project Proposal
- Traxxas TQi Telemetry Radio and App
- Modified Bike Project: Part 3 - Engine build
- Arduino Robot Project: Part 4 - Shield and Software
- Blade 180 CFX Helicopter: Part 2 - First Repair
- Arduino Robot Project: Part 3 - Building the Parts of the Line Robot
- Arduino Robot Project: Part 2 - Pre-Build
- Zeorbot Project - Update 1
- The World's Largest 3D Printed Fidget Spinner
- Blade 180 CFX Helicopter Introduction
- 3D Printer Filament Stand Project
- Zerobot Project Introduction
- Arduino Robot Project: Part 1 The Sensor Board
- Boca Bearings Mavic Cosmic Carbones
- Scan-O-Tron Project: Kinect Attached
- Modified Bike Project: Part 2 Frame Set Up
- Okuma Krios KS 273W Bearing Comparison
- eMerge Americas 2017
- Boca Bearings 3D Printed Spinner Competition
- Avet HXW Raptor Ceramic Bearing Upgrade
- Electric Skateboard Project Update 1
- ELB Pro Flipper Butterfly Knife Bearing Upgrade
- RC Car Project Update
- Making 3D-Printed Fidget Spinners
- Fidget Spinner Bearing Spin Time Comparison
- Marine Robotics Club Introduction
- Modified Bike Project: Part 1 1976 Cimmato City Bike
- Peacock Bass Fishing In South Florida
- How to Install Bearings in Mavic Crossmax SL Wheels
- 3D Printed Robotic Hand Project Revisision
- How to Install Bearings in a THM Carbones Clavicula Crankset
- Scan-o-tron project: Building accessories
- Bloomer Tree Kinetic Artwork Donation, Damage, Repair and Relocation
- Electric Skateboard Project Introduction
- Line Roller Bearing Replacement Shimano Symetre 4000RI
- How to change the bearings in a Shimano Citica 200D
- Scan-o-tron Project Introduction
- How to change the bearings in a Shimano Chronarch CI4+
- Maker Faire Miami
- Sketch Bot Project Update 1
- How to change the bearings in a Shimano Curado 50e
- Boca Bearings Releases Expanded Inventory of Ceramic Hybrid Bearings
- X-Carve Vacuum Attachment
- Crossfire 3D Printed Quadcopter Part 7
- Boca Bearings Releases New Ceramic Hybrid Go Series
- Crossfire 3D Printed Quadcopter Part 6
- Sketch Bot Project Update
- Crossfire 3D Printed Quadcopter Part 5
- Sponsored Racer: Kevin Thomas, 2017 Palmetto Classic - Race Report
- Boca Bearing's Guide for Fidget Spinners
- Crossfire 3D Printed Quadcopter Part 4
- Crossfire 3D Printed Quadcopter Part 3
- Crossfire 3D Printed Quadcopter Part 2